The Card vault integrates features like wallets and tokenization without processing the payment.
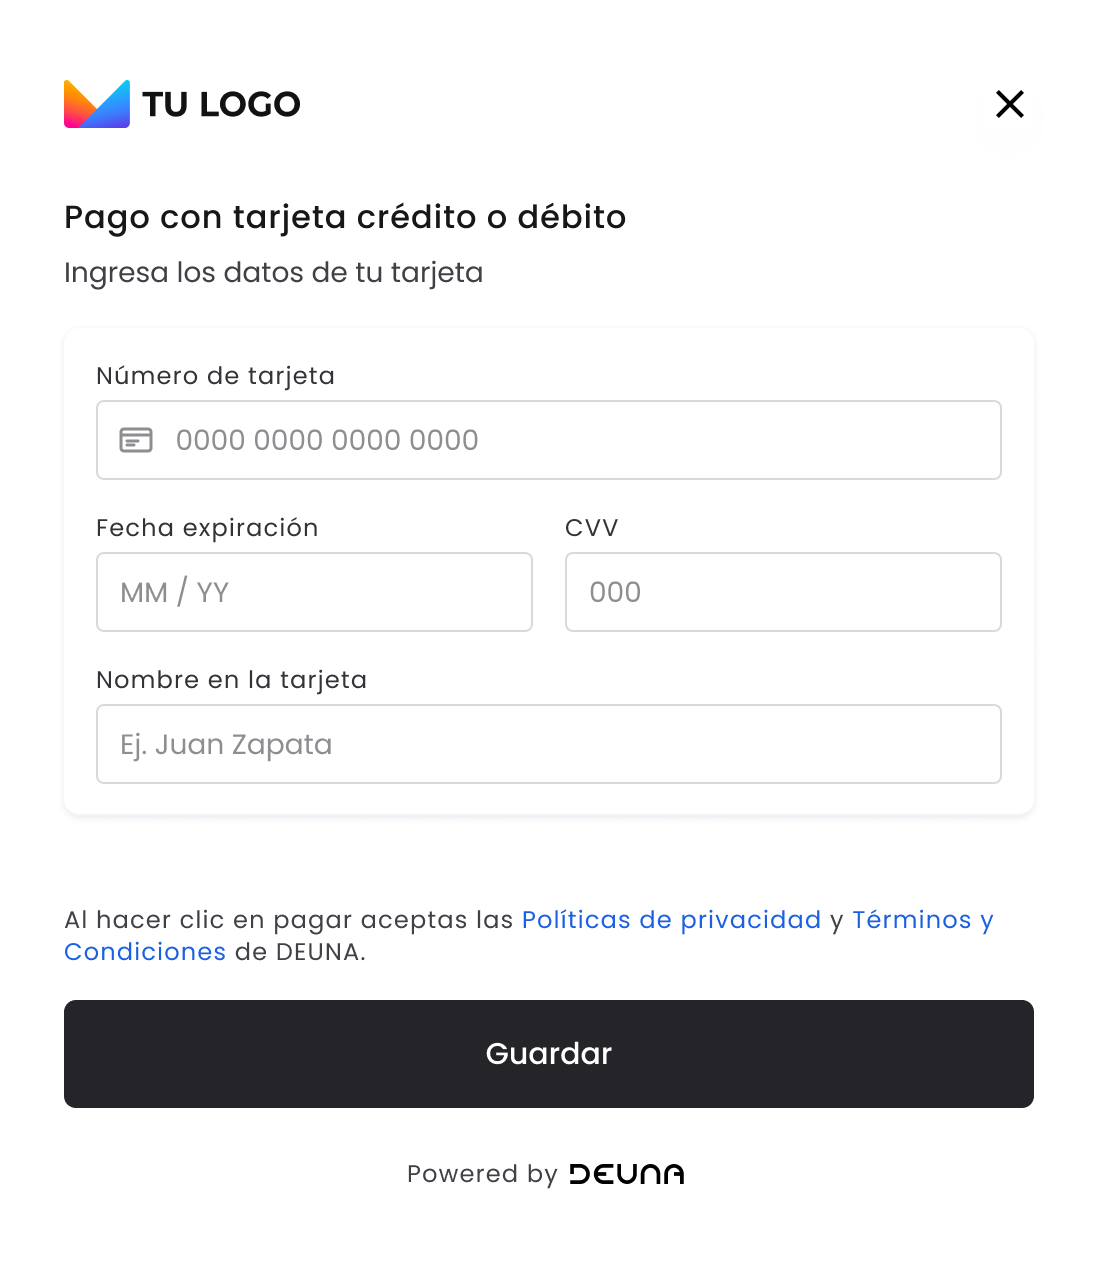
The Card Vault is a component of DEUNA Payment solutions and contains different types of widgets that allow you to:
- Store credit and debit cards securely in the Vault.
- Make Click To Pay payments with the Click To Pay widget.
You can also integrate the Click To Pay widget via iFrame.
1. Initialize the widget
Before integrating the Payment Widget, complete the First steps - Web.
Available Parameters
During the call of the initialize method, you have the preloadWidgets property where you can define all the params to determine the behavior of the payment widget, these are:
  await DeunaSDK.initialize({
		...
    preloadWidgets: [
      {
        widget: 'elements',
        params: {
          // --- Display ---
          mode: 'target',           // 'modal' (default) | 'target'
          target: '#container',     // Required when mode is 'target'. CSS selector of the container element.

          // --- Tokens if available (can be deferred to initElements()) ---
          orderToken: 'xxxx-xxxx',  // Order token
          userToken: 'xxxx-xxxx',    // User token

          // --- Localization ---
          language: 'es',           // 'es' | 'pt' | 'en'

					// --- Custom styles ---
          styleFile: 'https://example.com/custom-styles.css', // URL to a custom CSS file

          // --- Custom domain ---
          domain: 'https://example.com', // Custom domain override

          // --- Hide pay button ---
          hidePayButton: false,

          // --- Widget types ---
          types: [
            { name: 'vault' },        // 'vault' | 'click_to_pay'
          ],

          // --- Pre-fill user data ---
          userInfo: {
            firstName: 'John',
            lastName: 'Doe',
            email: '[email protected]',
          },

          // --- Widget behavior ---
          behavior: {
            hidePayButton: false,
            paymentMethods: {
              creditCard: {
                flow: 'purchase',           // 'purchase' | 'tokenize'
                splitPayments: {
                  maxCards: 2,
                },
              },
            },
          },

          // --- Theme & UX ---
          widgetExperience: {
            theme: {
              mainColor: '#000000',
              secondaryColor: '#ffffff',
              backgroundColor: '#f5f5f5',
              font: 'Roboto',
              imageUrl: 'https://example.com/logo.png',
              banner: 'https://example.com/banner.png',
              mainActionButtonText: 'Pay now',
            },
            userExperience: {
              showSavedCardsFlow: true,
              defaultCardFlow: false,
              disableInstallments: false,
            },
            flags: {
              allowSaveUserInfo: true,
            },
          },

          // --- Callbacks ---
          callbacks: {
            onSuccess: (data) => {},
            // data: full order/payment response object

            onError: (error) => {},
            // error.type: string
            // error.metadata.code: string
            // error.metadata.message: string

            onClosed: (action) => {},
            // action: 'userAction' | 'systemAction'

            onEventDispatch: (event, payload) => {},
            // event: string — event name
            // payload: object — event data

            onCardBinDetected: (data) => {},
            // data.cardBin: string
            // data.cardBrand: string

            onInstallmentSelected: (data) => {},
            // data.cardBin: string
            // data.installmentPlanOptionId: string

            onResize: (dimensions) => {},
            // dimensions.height: number
            // dimensions.width: number
          },
        },
      },
    ],
  });
Display the widget
To display the Vault Widget, call the function initElements passing the following data:
await DeunaSDK.initElements({
  orderToken: 'xxxx-xxxx', // if not passed into the previous step.
  userToken: 'xxxx-xxxx' // if not passed into the previous step.
});
1.2 Alternative Integration
There is another integration flow where you can pass al the params we describe previously into the preloadWidgets property in the Available Parameters section, but this time, those params will be passed during the initPaymentWidget method call.
await DeunaSDK.initElements({
	... // All the params describe into the Available parameters section.
});
From now on, all the explanation including one of the available params, could be passed in the preloadWidgets property of the initialize method or in the initElements method, depending on the type of integration you've chosen.
To guarantee the best performance available for the initial widget load, use the preload integration approach.
Parameters description
| Attributes | Description |
|---|---|
orderToken | The orderToken is a unique token generated for the payment order. This token is generated through the DEUNA API, and you must implement the corresponding endpoint in your backend to obtain this information. You can extract the available user information in An |
userToken (Optional) | The bearer token of the DEUNA user. When this is sent, all actions within the widget will be done on this DEUNA user. In order for this In case you miss an |
userInfo | User information to be passed to the widget, possible information available to pass are: Note: The |
widgetExperience | Overrides merchant settings. Currently supported by the widget are the following:
|
language (Optional) | The payment widget language can be overridden by sending a parameter with a supported language. The main languages available are en (English), es (Spanish), and pt (Portuguese). If this parameter is not sent, the default language will be used. |
callbacks | Callbacks are return functions that are responsible for listening to and handling events from the payment widget. These events allow you to manage specific actions based on the status of the payment. The main callbacks include: |
styleFile (Optional) | UID provided by DEUNA. This applies if you want to configure a If a valid value is provided for |
paymentMethods (Optional) | A list of allowed payment methods. This parameter determines what type of widget should be rendered. |
target(Optional) | By default, DEUNA widgets are displayed in a modal. If you prefer to display the widget inside a specific HTML element, use the parameter target o specify the ID or class name of the HTML element (using selectors) where you want to render the widget. Examples: #my-container, .my-container |
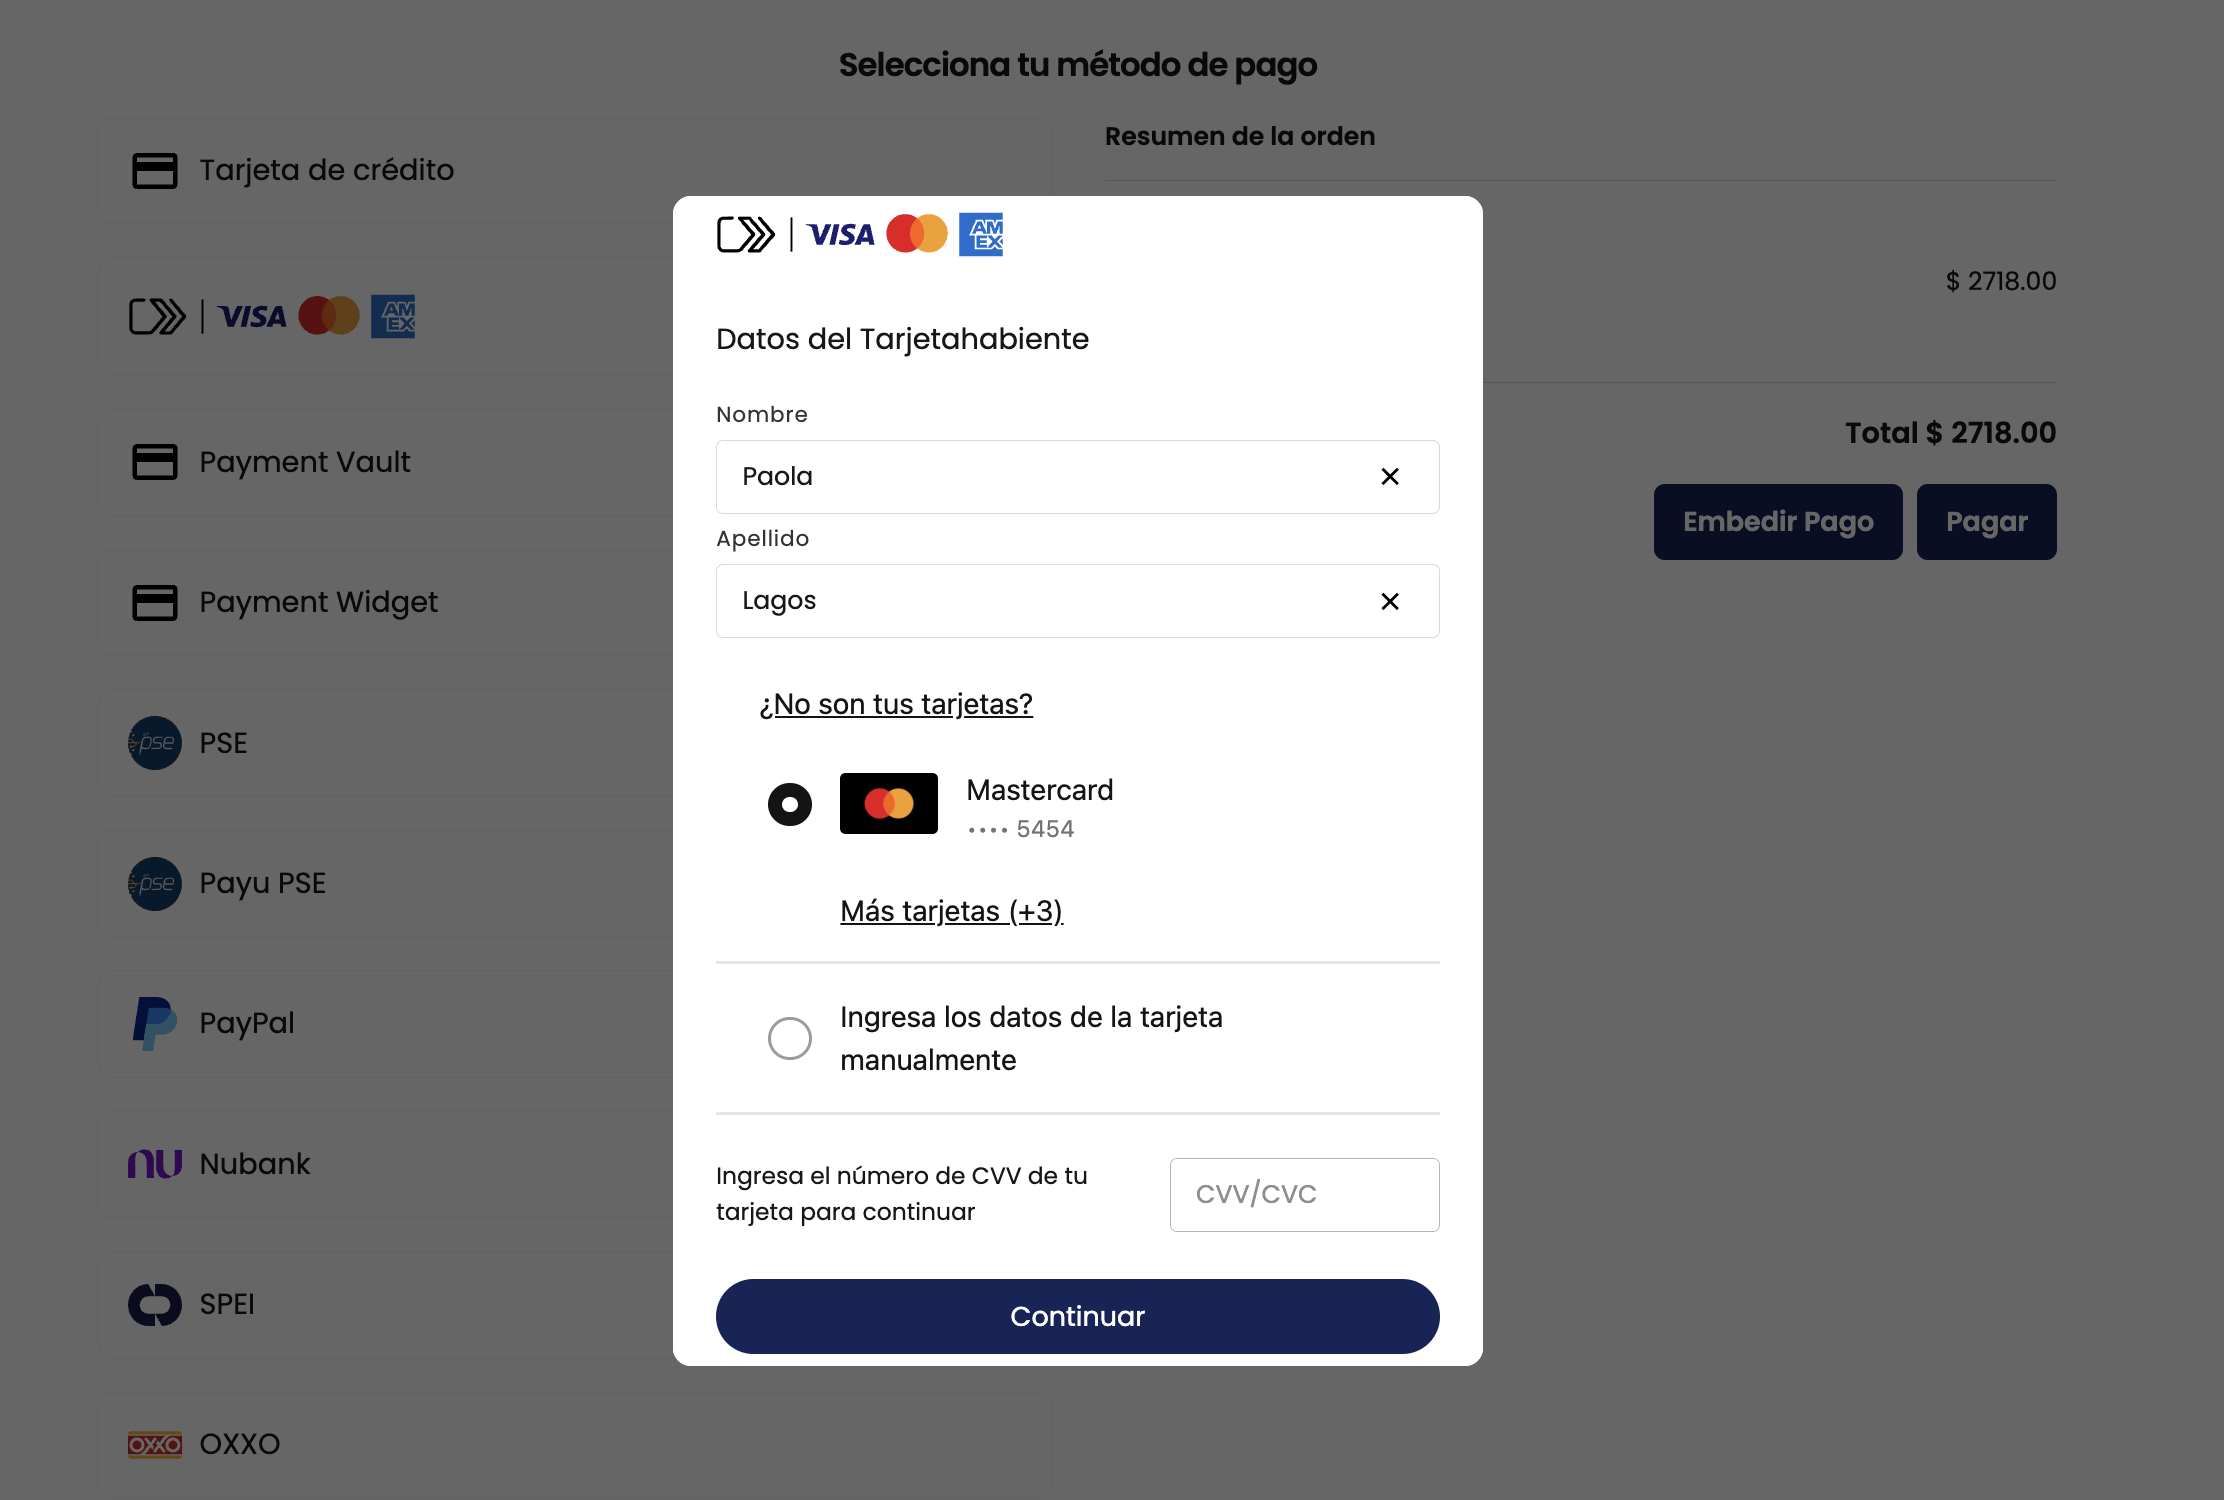
types (Optional) | An instance with a list of the widget types that should rendered. Allowed values are: vault and click_to_pay . Example: and contains different types If this parameter is not passed, the DEUNA Vault Widget will be displayed by default to store credit and debit cards |
language(Optional) | This parameter allows you to specify the language in which the widget interface will be displayed. It must be provided as a valid language code (for example, "es" for Spanish, "en" for English, "pt" for Portuguese). Behavior:
|
behavior (Optional) | Use this parameter to configure the widget's behavior. |
hidePayButton (Optional) | If set to true, the widget's payment button will be hidden, allowing for completely manual payment management. This means the user will need to explicitly call the methods |
The behavior parameter (optional)
behavior parameter (optional)The initialize preloadWidget property or the initElements method accepts the behavior parameter.
This parameter allows you to customize the behavior of the payment widget, including enabling multi-card payments, among other configuration options.
These settings apply to all payment methods enabled in the widget.
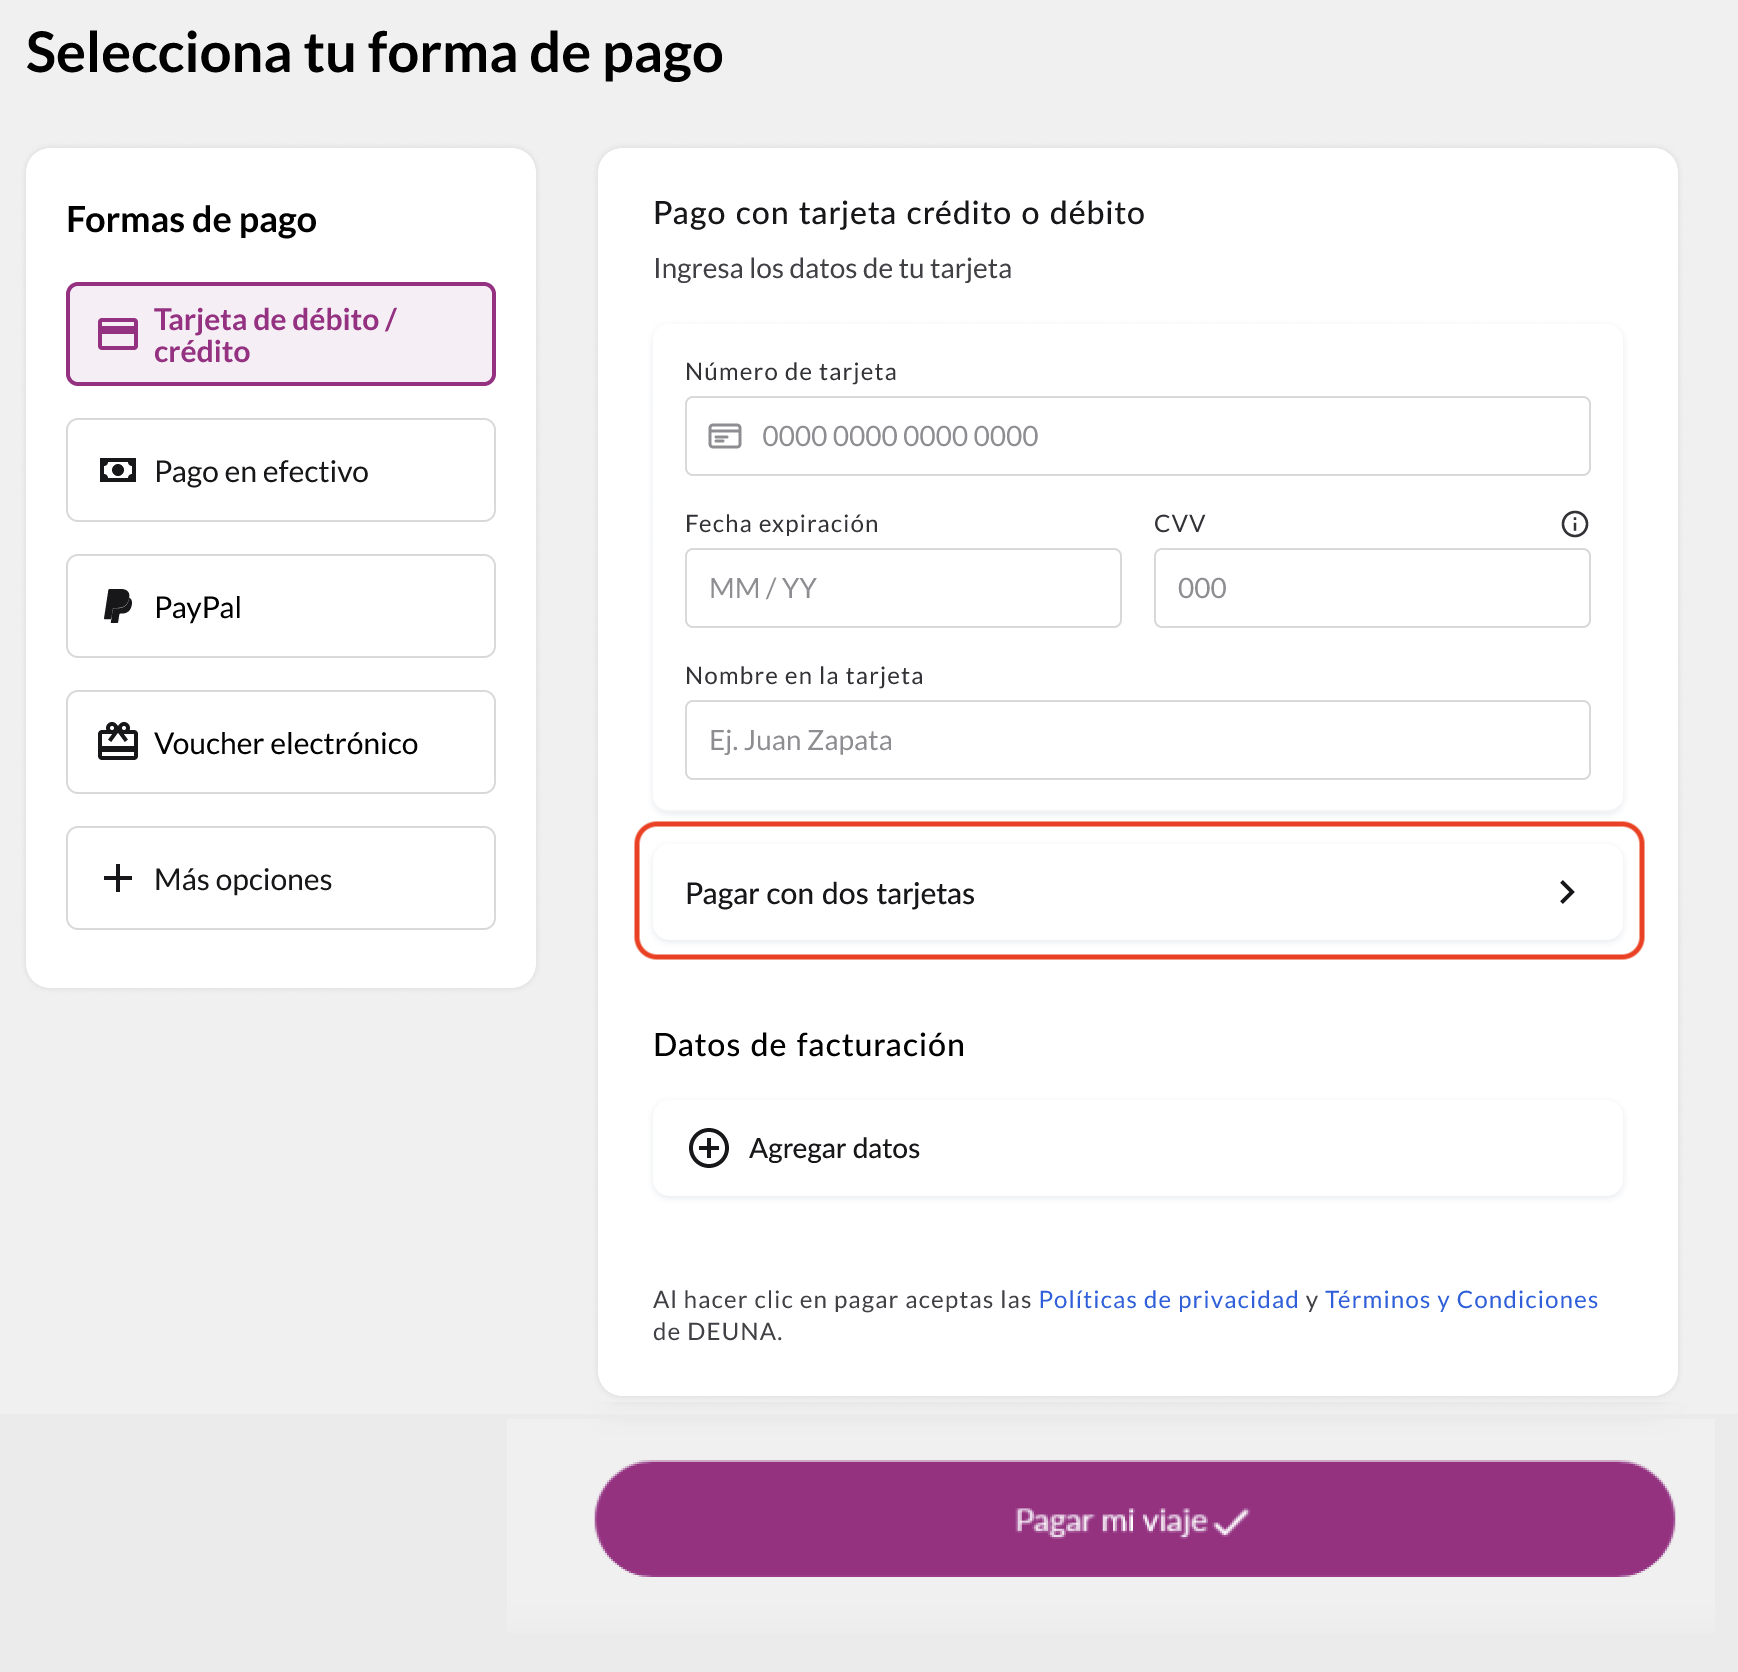
Split Payment on Multiple Cards
The feature Split Payments allows customers to split payments for a purchase between multiple credit/debit cards.
- The option must be enabled in the trade settings.
- Currently, only splitting between two cards is supported at most.
{
  orderToken: "order_token",
  ...
  behavior:{
    paymentMethods:{
      creditCard: {
        splitPayments: {
          // Maximum number of allowed saved cards
          maxCards: 2
        }
      }
    }
  }
};
onlyCardEnrollment
This parameter allows you to hide the saved cards of an authenticated user (external authorizer or OTP), only allowing the registration of a new one; this override is recommended when the card view (UI) is managed externally.
| External Authorizer | OTP | onlyCardEnrollment | Cards visible? |
|---|---|---|---|
| ✅ | ❌ | ❌ | ✅ |
| ✅ | ❌ | ✅ | ❌ |
| ❌ | ✅ | ❌ | ✅ |
| ❌ | ✅ | ✅ | ❌ |
WebSDK configuration
{
  orderToken: '<ORDER_TOKEN>',
  userToken: '<AUTHENTICATION_TOKEN>',
  userInfo: { ... },
  behavior: {
	  onlyCardEnrollment: true,
	  ...
  },
  callbacks: {
    onSuccess: (data) => {
      ...
    },
    onError: (error) => {
      ...
    },
    ...
  },
  ...
};
1.3 Click To Pay Widget
Using the parameter types in the function initElements, make a payment with Click To Pay.
The following code snippet shows how to display the Click To Pay widget.
{
  orderToken: "<DEUNA order token>", // Optional, you can extract user info from order
  userInfo: { // Opcional
    email: '[email protected]',
    firstName: 'John',
    lastName: 'Doe',
  },
  types: [{ name: "click_to_pay" }],
  callbacks: {
    // opcionales
    onClosed: (action) => console.log("cerrado desde Click to Pay"),
    onSuccess: (data) => console.log("purchaseResponse: ", data),
    onInstallmentSelected: (data) => console.log("installment selected"),
    onCardBinDetected: (payload) => console.log("bin detected"),
    onError: (error) => console.log("error", error),
    onEventDispatch: (event, payload) => {
      console.log("onEventDispatch: ", { event, payload });
    },
  },
};
2. Listen to card vault events
When a card save is successful or fails, you can do this by listening to Vault Widget events using callbacks.
The callbacks passed allows you to listen for widget events. Define the corresponding callbacks to update your app's interface.
Callbacks
| Callback | Trigger |
|---|---|
onSuccess | Executed when a card is saved successfully. This callback contains a JSON parameter with the order information. |
onError | Executed when an error occurs while saving the card. This callback contains a JSON parameter which identifies the type of error produced. |
onClosed (Optional) | Executed when the payment widget is closed. This callback contains a string parameter whose values can be one of the following:
|
onCardBinDetected(Optional) | Executed when the payment widget detects the BIN of an entered credit or debit card or when the user deletes the entered card number. This callback contains a JSON parameter with the bin information and the brand of the entered card. The JSON parameter will be null when the user removes the text entered in the card number field. |
onInstallmentSelected (Optional) | If the order can be deferred, this callback will be executed when the user selects the months to defer. This callback contains a JSON parameter with the information of the months to defer selected by the user. NOTE: The JSON parameter will be null when the user selects current payment (No installments). |
onEventDispatch (Optional) | It is executed on all events that the widget can produce. This callback contains a string parameter and the data (JSON) associated with that event. |
Example
{
  orderToken: "<DEUNA order token>",
  userToken: "...",
  callbacks: {
    onSuccess: ...,
    onCardBinDetected: async (cardBinMetadata) => {
      if (cardBinMetadata) {
        // ...
      }
    },
    onError: (error) => console.log("error", error),
    onEventDispatch: (event, payload) => {
	    console.log("onEventDispatch: ", { event, payload });
	  }
  },
);
3. Close the vault
By default, the Card vault only closes when the user presses the widget's close button.
To close the modal when a payment is successful or when an error occurs, you must call the close function.
await DeunaSDK.close();The following sample code shows how to close the vault when a card save is successful..
{
  orderToken: "<DEUNA order token>", // Mandatory order token
  callbacks: {
    // opcionales
    onSuccess: async (data) => {
      await DeunaSDK.close(); // Close the payment widget
      console.log("purchaseResponse: ", data);
    },
  },
};
4. Customize the vault's appearance
Use the function setCustomStyle to customize the appearance of the Widget.
await DeunaSDK.setCustomStyle({...});
For more information refer to CustomStyle.
Example
{
  orderToken: "<DEUNA order token>", // Mandatory: Order token to initialize widget
  callbacks: {
    onSuccess: ...,
    onCardBinDetected: async (cardBinMetadata) => {
      await DeunaSDK.setCustomStyle({
        theme: {
          colors: {
            primaryTextColor: "#023047",
            backgroundSecondary: "#8ECAE6",
            backgroundPrimary: "#F2F2F2",
            buttonPrimaryFill: "#FFB703",
            buttonPrimaryHover: "#FFB703",
            buttonPrimaryText: "#000000",
            buttonPrimaryActive: "#FFB703",
          },
        },
        HeaderPattern: {
          overrides: {
            Logo: {
              props: {
                url: "https://images-staging.getduna.com/ema/fc78ef09-ffc7-4d04-aec3-4c2a2023b336/test2.png",
              },
            },
          },
        },
      });
    },
  },
};
Customize the pay button
Use your own button inside the Widget.
The DEUNA SDK allows you to hide the native "Save" button included in the Payment Vault and replace it with a custom button integrated into the merchant interface.
This feature is ideal for:
- Maintain a user experience consistent with the store's design.
- Integrate card saving into your own workflows or custom steps.
- Have greater control over the exact moment when the payment method save action is triggered.
1. Hide the native button
When initializing the widget, activate the parameter hidePayButton:
- If
hidePayButtonis false or undefined, the widget displays its standard button. - If
hidePayButtonis true, the widget hides the button.
{
  orderToken: "order_ABC123",
  hidePayButton: true, // ← Hides native button (default: false),
  ...
};
This setting cannot be changed dynamically after the widget is initialized.
2. Customized button
Approve data and execute payments.
When you use DeunaSDK.initElements(...), the user can employ the following methods to validate and execute the card saving..
| Method | Description | Response |
|---|---|---|
DeunaSDK.isValid() | Checks whether card information has been entered and if a save attempt can be made | true if the information is valid, false otherwise. |
DeunaSDK.submit() | Executes the card saving process, equivalent to pressing the save button. | { status: "success", message: "card saves succesfully" } o { status: "error", message: "The submit flow is not available" } |
- Use
isValid()before callingsubmit()to avoid errors in the saving process. isValid()andsubmit()can be used at any time, without depending onmanualSubmit.- In
hidePayButtonis true, the save card button will not be displayed and the save will need to be managed withsubmit(). - If the save stream is not yet available,
submit()will return an error with the message "The submit flow is not available". - The responses in
isValidandsubmitreturn a promise. isValid()allows you to keep a payment button in the disabled state until all fields are filled out and valid. This enables its own control logic to decide when to activate the payment button, which is what should subsequently be calledsubmit()
Prevent multiple submissions
When users interact with the save or pay button — whether it's the native widget button or a custom one — they may accidentally click it multiple times in quick succession. This can result in duplicate backend requests, which may lead to:
- Duplicate card vault entries.
- Unexpected errors from the API.
- A degraded user experience.
To protect against this, we recommend implementing a lock mechanism that ensures only one request is processed at a time. While a request is in-flight, any subsequent calls are ignored until the first one completes.
Important: This pattern is especially critical when using a custom button withhidePayButton: trueand manually callingsubmit(), since there is no built-in UI protection against rapid clicks.
How it works
The lock utility wraps any asynchronous function and guarantees that:
- The first call executes immediately.
- Any calls made while the first is still running are silently ignored (returning
undefined). - Once the original call completes (whether it succeeds or fails), the lock is released and new calls are accepted.
JavaScript implementation
/**
 * Creates a locked version of an async function that prevents
 * concurrent executions. While the function is running, any
 * additional calls will be ignored and return undefined.
 *
 * @param {Function} fn - The async function to protect.
 * @returns {Function} A wrapped function with built-in lock protection.
 */
function lock(fn) {
  let isLocked = false;

  return async function (...args) {
    if (isLocked) {
      console.warn("[lock] Request already in progress. Skipping duplicate call.");
      return undefined;
    }

    isLocked = true;

    try {
      return await fn(...args);
    } finally {
      isLocked = false;
    }
  };
}
TypeScript implementation
type AsyncFunction<Args extends unknown[] = unknown[], Return = unknown> = (
  ...args: Args
) => Return | Promise<Return>;

/**
 * Creates a locked version of an async function that prevents
 * concurrent executions. While the function is running, any
 * additional calls will be ignored and return undefined.
 *
 * @param fn - The async function to protect.
 * @returns A wrapped function with built-in lock protection.
 */
function lock<Args extends unknown[], Return>(
  fn: AsyncFunction<Args, Return>
): (...args: Args) => Promise<Return | undefined> {
  let isLocked = false;

  return async (...args: Args): Promise<Return | undefined> => {
    if (isLocked) {
      console.warn("[lock] Request already in progress. Skipping duplicate call.");
      return undefined;
    }

    isLocked = true;

    try {
      return await fn(...args);
    } finally {
      isLocked = false;
    }
  };
}
Usage with the DEUNA SDK
The following example shows how to use the lock utility with a custom button and the submit() method:
// Wrap the submit call with the lock utility
const safeSubmit = lock(async () => {
  const isValid = await DeunaSDK.isValid();

  if (!isValid) {
    console.warn("Card information is not valid.");
    return;
  }

  const result = await DeunaSDK.submit();
  console.log("Submit result:", result);
  return result;
});

// Initialize the widget with a hidden native button
... // Preload or initElements
{
  orderToken: "<DEUNA order token>",
  hidePayButton: true,
  callbacks: {
    onSuccess: async (data) => {
      await DeunaSDK.close();
      console.log("Card saved successfully:", data);
    },
    onError: (error) => {
      console.error("Error saving card:", error);
    },
  },
};

// Attach the locked function to your custom button
document.getElementById("my-save-button").addEventListener("click", safeSubmit);
With this pattern in place, even if the user rapidly clicks the button multiple times, only the first click triggers the actualsubmit()call. All subsequent clicks are safely ignored until the operation finishes.
Usage with a custom purchase endpoint
If your integration uses its own backend endpoint to process a purchase (e.g., after vaulting a card), you should also protect that call with the lock utility. This prevents duplicate charges when a user clicks the buy button multiple times.
JavaScript example
/**
 * Calls your own backend purchase endpoint.
 * Replace the URL and payload with your actual implementation.
 */
async function purchaseOnBackend(orderData) {
  const response = await fetch("https://api.your-store.com/purchase", {
    method: "POST",
    headers: { "Content-Type": "application/json" },
    body: JSON.stringify(orderData),
  });

  if (!response.ok) {
    throw new Error(`Purchase failed with status ${response.status}`);
  }

  return response.json();
}

// Wrap the entire flow (validate → submit → purchase) with the lock
const safePurchase = lock(async () => {
  // 1. Validate the card information in the widget
  const isValid = await DeunaSDK.isValid();
  if (!isValid) {
    console.warn("Card information is not valid. Aborting purchase.");
    return;
  }

  // 2. Submit the card to the vault
  const submitResult = await DeunaSDK.submit();
  if (submitResult.status !== "success") {
    console.error("Card vault submission failed:", submitResult.message);
    return;
  }

  // 3. Call your own backend to process the purchase
  const purchaseResult = await purchaseOnBackend({
    orderId: "order_ABC123",
    vaultedCard: submitResult,
    amount: 4999, // amount in cents
    currency: "USD",
  });

  console.log("Purchase completed:", purchaseResult);
  return purchaseResult;
});

// Initialize the widget
... // Preload or initElements
{
  orderToken: "<DEUNA order token>",
  hidePayButton: true,
  callbacks: {
    onSuccess: async (data) => {
      await DeunaSDK.close();
      console.log("Card saved successfully:", data);
    },
    onError: (error) => {
      console.error("Error:", error);
    },
  },
};

// Attach the locked purchase function to your custom button
document.getElementById("my-purchase-button").addEventListener("click", safePurchase);
TypeScript example
interface OrderData {
  orderId: string;
  vaultedCard: unknown;
  amount: number;
  currency: string;
}

interface PurchaseResponse {
  transactionId: string;
  status: string;
  [key: string]: unknown;
}

/**
 * Calls your own backend purchase endpoint.
 * Replace the URL and payload with your actual implementation.
 */
async function purchaseOnBackend(orderData: OrderData): Promise<PurchaseResponse> {
  const response = await fetch("https://api.your-store.com/purchase", {
    method: "POST",
    headers: { "Content-Type": "application/json" },
    body: JSON.stringify(orderData),
  });

  if (!response.ok) {
    throw new Error(`Purchase failed with status ${response.status}`);
  }

  return response.json() as Promise<PurchaseResponse>;
}

// Wrap the entire flow (validate → submit → purchase) with the lock
const safePurchase = lock<[], PurchaseResponse | void>(async () => {
  // 1. Validate the card information in the widget
  const isValid = await DeunaSDK.isValid();
  if (!isValid) {
    console.warn("Card information is not valid. Aborting purchase.");
    return;
  }

  // 2. Submit the card to the vault
  const submitResult = await DeunaSDK.submit();
  if (submitResult.status !== "success") {
    console.error("Card vault submission failed:", submitResult.message);
    return;
  }

  // 3. Call your own backend to process the purchase
  const purchaseResult = await purchaseOnBackend({
    orderId: "order_ABC123",
    vaultedCard: submitResult,
    amount: 4999, // amount in cents
    currency: "USD",
  });

  console.log("Purchase completed:", purchaseResult);
  return purchaseResult;
});

// Attach the locked purchase function to your custom button
const purchaseButton = document.getElementById("my-purchase-button");
purchaseButton?.addEventListener("click", safePurchase);
Key takeaway: By wrapping the entire flow — validation, card vaulting, and your backend purchase call — inside a singlelock(), you ensure that even rapid button clicks will only trigger one end-to-end transaction. This is critical to avoid duplicate charges on your own purchase endpoint.