Konduto
Konduto: Behavioral Analytics & Real-Time Decisioning
Konduto (an Equifax/Boa Vista company) is a highly innovative fraud prevention platform that stands out for its deep focus on navigational behavior. Originally built to tackle the complex fraud landscapes of Latin America, Konduto has grown into a powerful global tool that stops fraud by analyzing how a user browses, rather than just looking at the checkout data.
Capabilities:
- Navigational Behavior Profiling: Analyzes the user's entire journey on your site—from the pages they visit to the time spent on each, and how quickly they move to checkout—to build a behavioral trust profile.
- Deep Machine Learning: Utilizes AI models that constantly adapt to new fraud patterns, requiring minimal manual rule creation from the merchant.
- Real-Time Link Analysis: Cross-references data points (email, device, credit card) in milliseconds to identify hidden connections to known fraud rings.
- High-Speed Processing: Delivers decisions in sub-seconds, ensuring zero latency during the critical checkout moment.
How It Works With Our Orchestration Engine: Konduto provides an automated recommendation score based on their behavioral and transactional analysis. By connecting Konduto to our platform, their varied scoring outputs are instantly translated into our unified Low, Medium, and High Risk levels. This allows you to effortlessly configure our engine to approve low-risk behavior, challenge medium-risk behavior with manual review and/or 3DS authentication, and block high-risk profiles before an authorization is even attempted.
Risk Tiers
The table below outline how the raw responses and risk scores from each supported provider are mapped to these standardized levels, along with the default routing actions triggered by each tier. Keep in mind that while these represent our standard configurations, you have full control to customize what triggers each risk level to perfectly align with your business's unique risk appetite.
Konduto's API returns a clear recommendation string (APPROVE, REVIEW, DECLINE) alongside a numerical score (0.00 to 1.00) based on their deep navigational and behavioral analytics.
| Provider's Raw Response | Our Standardized Risk Level | Default Routing Strategy |
|---|---|---|
Recommendation: APPROVE / Score: > 0.80 | 🟢 LOW RISK | Process directly via preferred gateway |
Recommendation: REVIEW / Score: 0.30 - 0.79 | 🟡 MEDIUM RISK | Step-up authentication: Approve the transactions and wait for a manual review and/or Trigger 3D Secure (3DS) |
Recommendation: DECLINE / Score: < 0.30 | 🔴 HIGH RISK | Deny transaction OR Route to specialized high-risk gateway |
Requirements
The following content lists all the requirements for a successful integration with Konduto.
Test environment
You need the following credentials to test an integration with Konduto:
- API test credentials:
- Public key
- Secret key
- Dashboard test access:
- Email associated with your Konduto account.
- Password
Production environment
You need the following credentials to complete a production integration with Konduto:
- Konduto test environment certification.
- Productive Konduto account credentials:
- Email associated to your Konduto account.
- Password
- Access to the production Konduto API:
- Public API key
- Secret API key
- Your DEUNA credentials.
- Real card to perform tests.
Test environment certification
Konduto requires that you test the integration before using a production environment.
After you finish the test integration, you receive a certification from Konduto.
Your DEUNA TPM will accompany you in the communications with Konduto.
Integrate Konduto
Now that the technical requirements are set, you can start the integration.
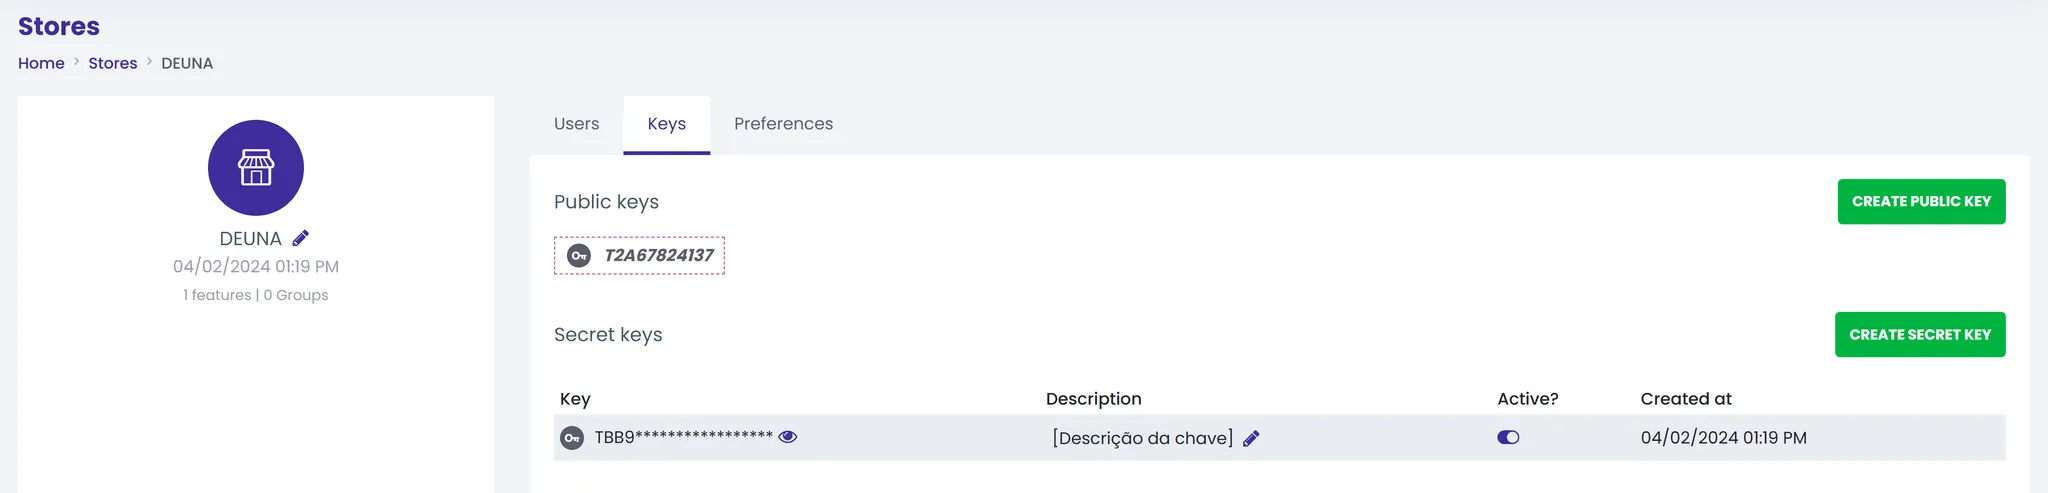
1. Set up Konduto’s dashboard
Go to your Konduto account and review your API keys:
- Select Stores under the user icon.
- Select the edit button in your Store and then click Keys.

- Review that the keys are functional by toggling on Active?.
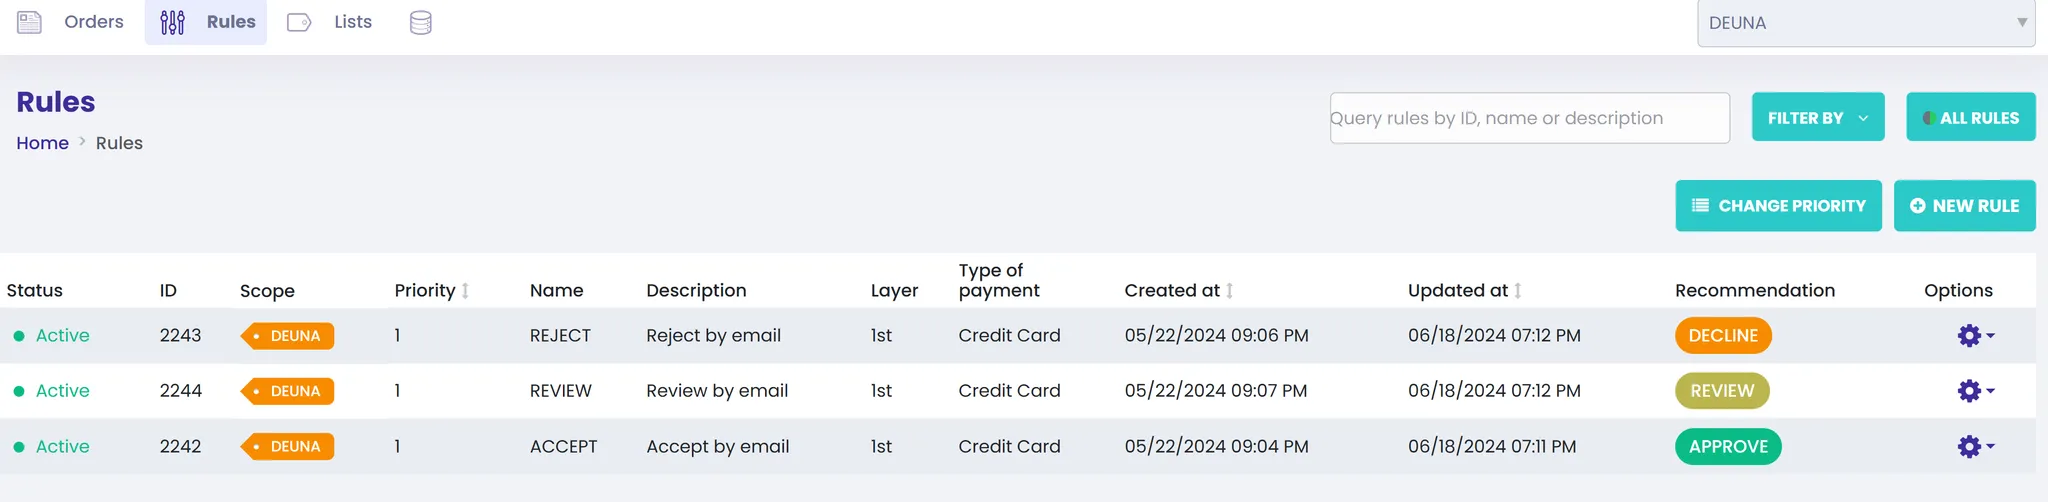
2. Create rules
After reviewing your API keys, create rules to test the integration.
Rules determine when a transaction is approved, denied, or needs a manual review.
Create rules for approve, deny, and manual review:
- Click the Rules tab.
- Click NEW RULE.
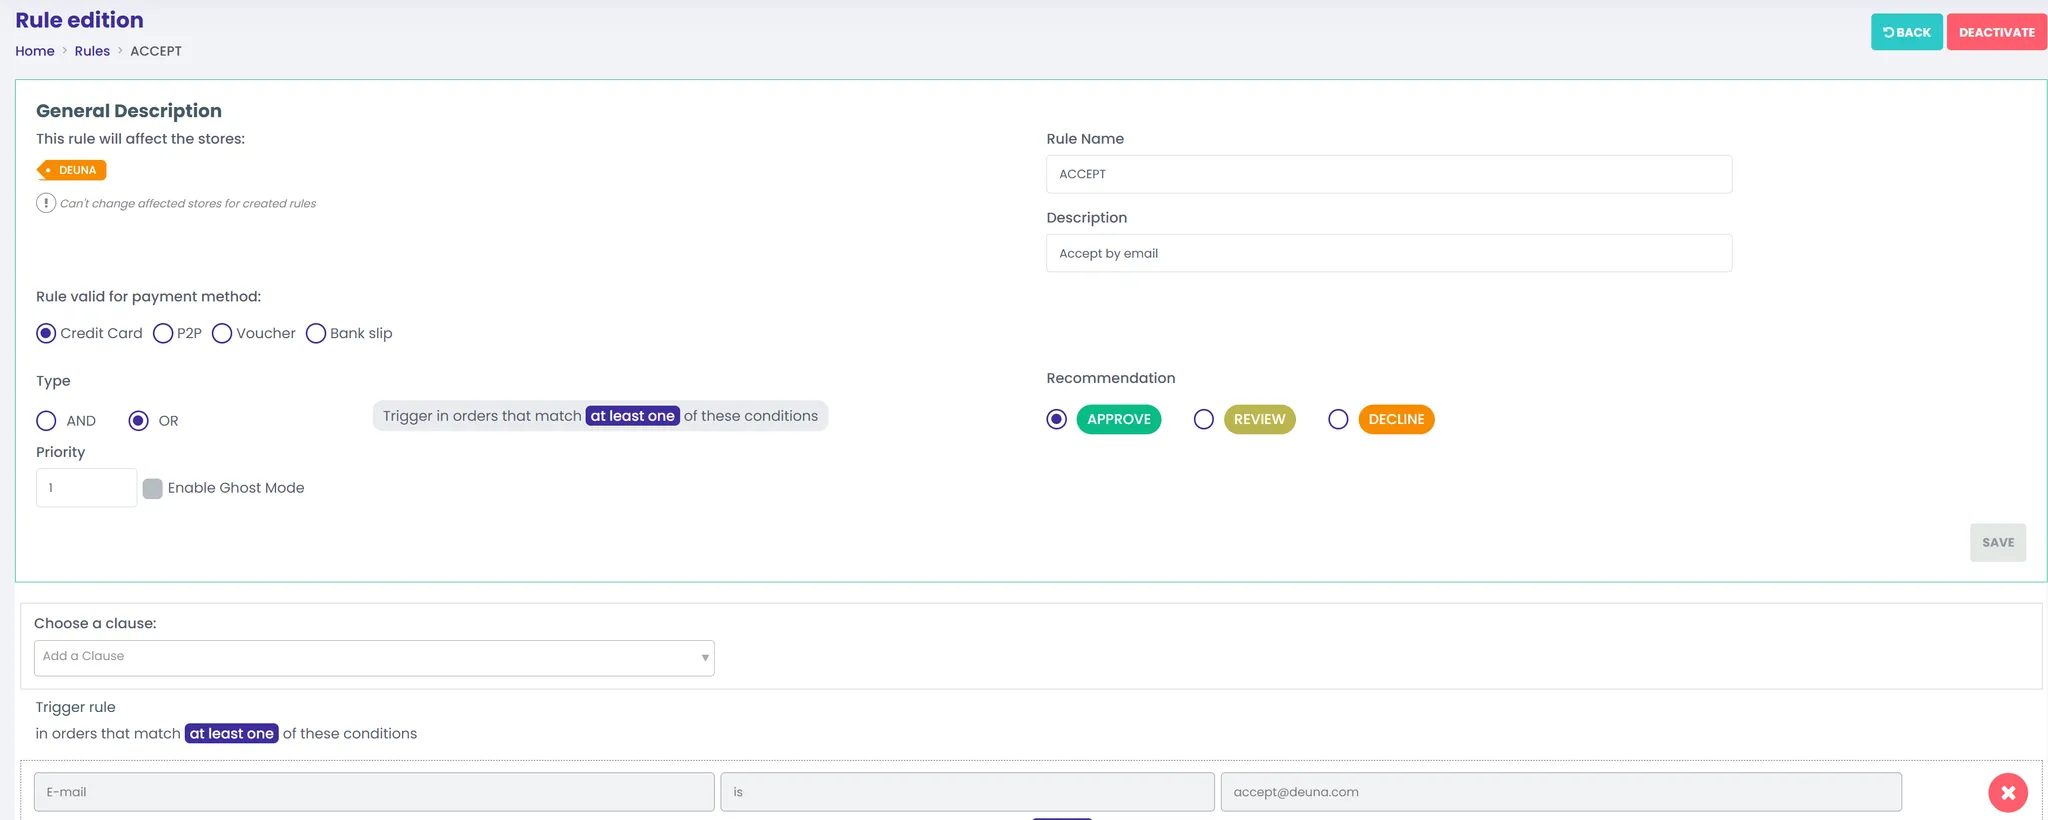
- Create the Always Accept Rule with the following values:
- Select Credit Card for Rule valid for payment method.
- Select OR for Type.
- Enter ACCEPT in Rule Name.
- Enter Accept by email in Description.
- Select APPROVE for Recommendation.
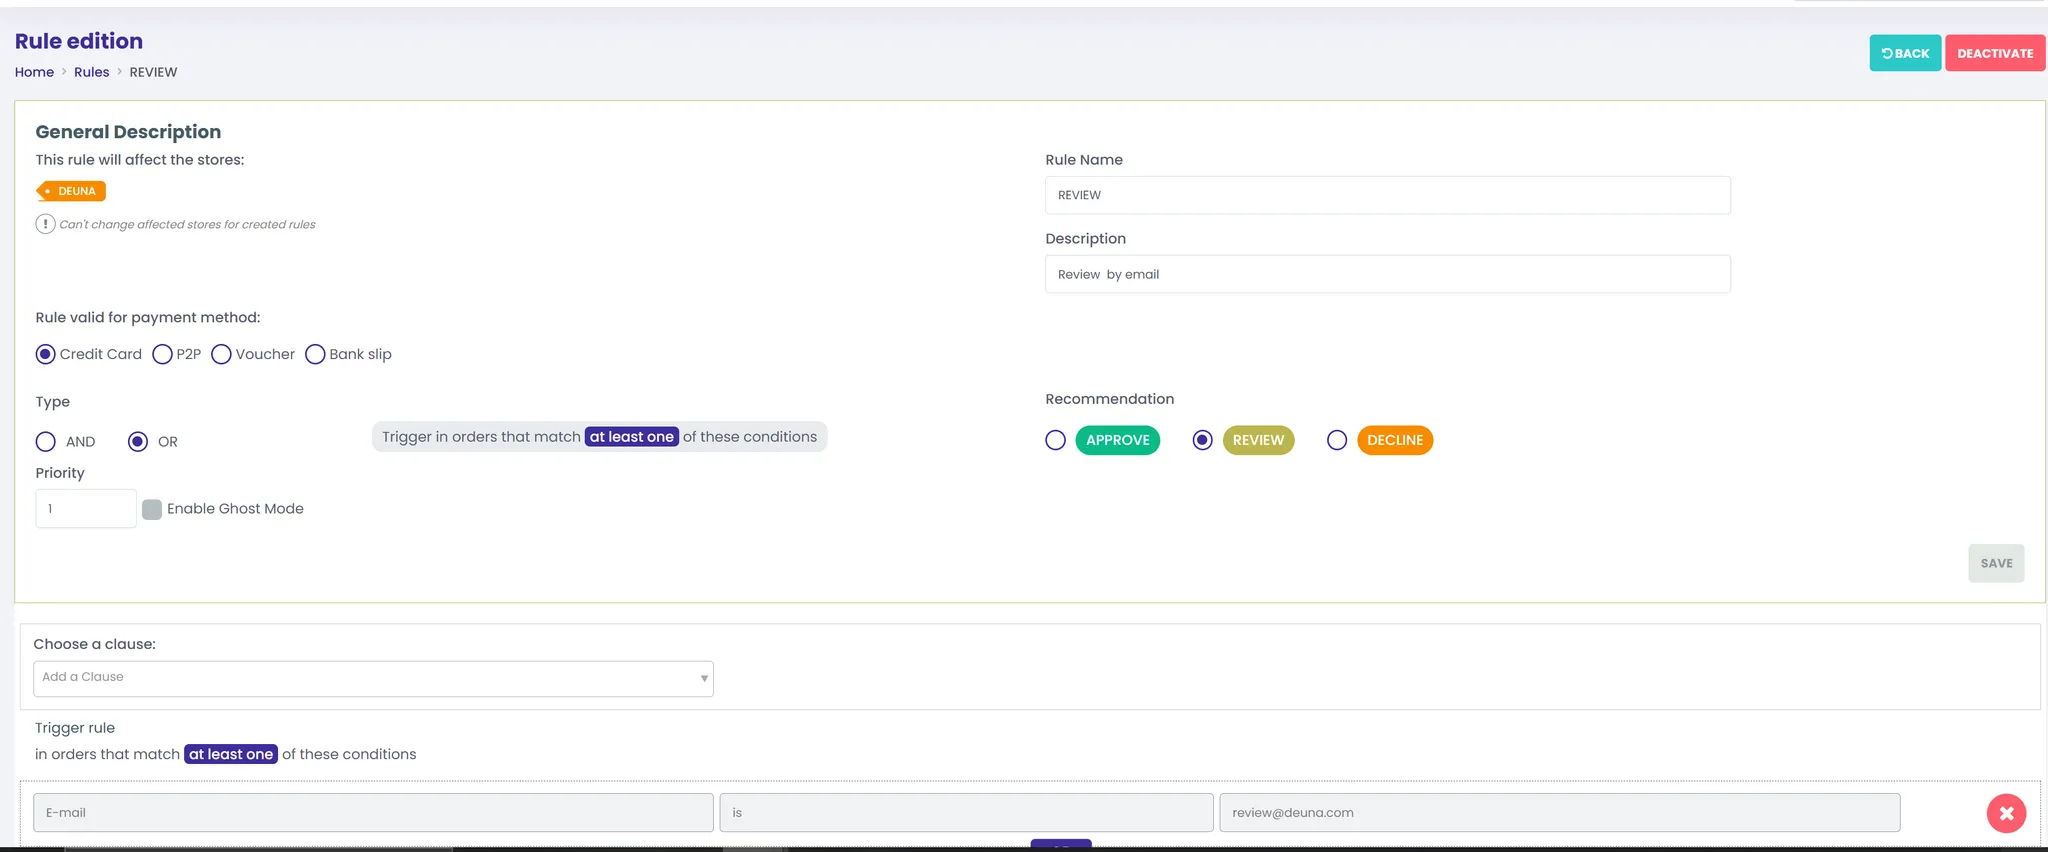
- Create the Always Review Rule with the following values:
- Select Credit Card for Rule valid for payment method*.
- Select OR for Type.
- Enter REVIEW in Rule Name.
- Enter Review by email in Description.
- Select REVIEW for Recommendation.
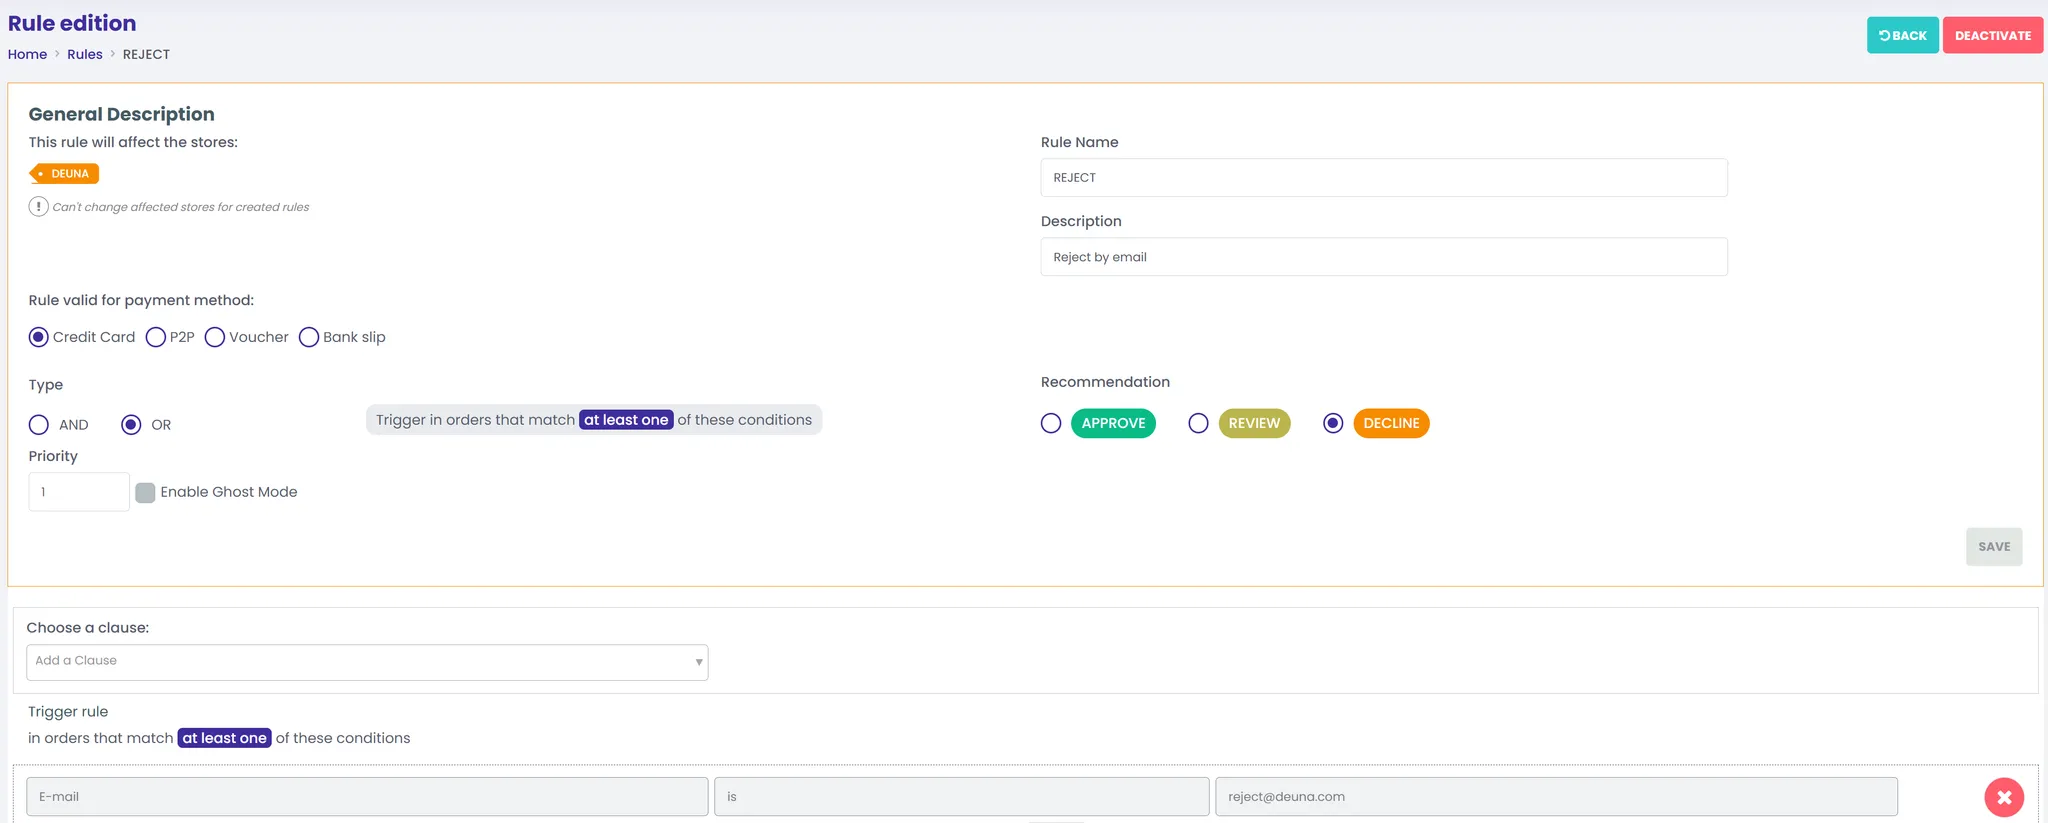
- Create the Always Decline Rule with the following values:
- Select Credit Card for Rule valid for payment method.
- Select OR for Type.
- Enter REJECT in Rule Name.
- Enter Reject by email in Description.
- Select DECLINE for Recommendation.
3. Configure the webhook
Now, connect Konduto with Deuna using a webhook:
- Select “Stores” under the user icon.
- Select the edit button in your store and click Preferences.
- Paste the webhook:
- https://api.stg.deuna.io/post-transactions/konduto for DEUNA staging environment.
- https://api.sandbox.deuna.io/post-transactions/konduto for DEUNA sandbox Environment.
- Click Save to finish.
4. Set up the DEUNA test environment
Add Konduto to your DEUNA Connections:
-
Go to the DEUNA Admin and toggle on Test mode.
-

-
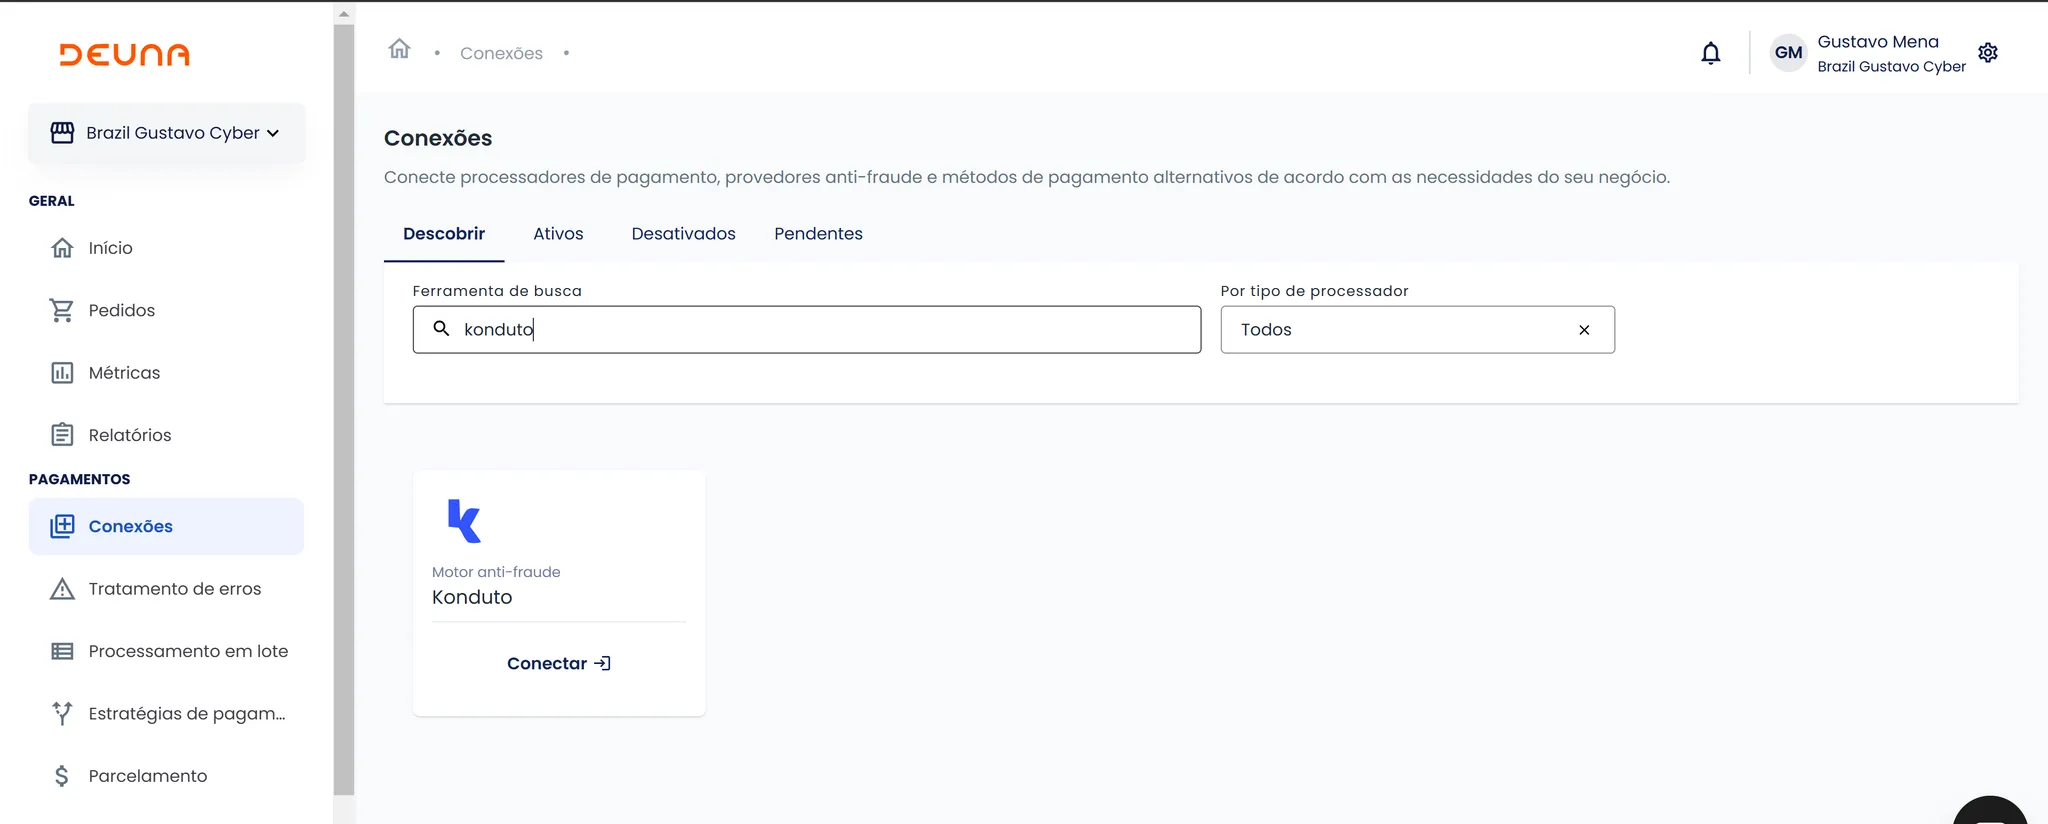
Click Connections.
-
Look for Konduto and click Connect.
-
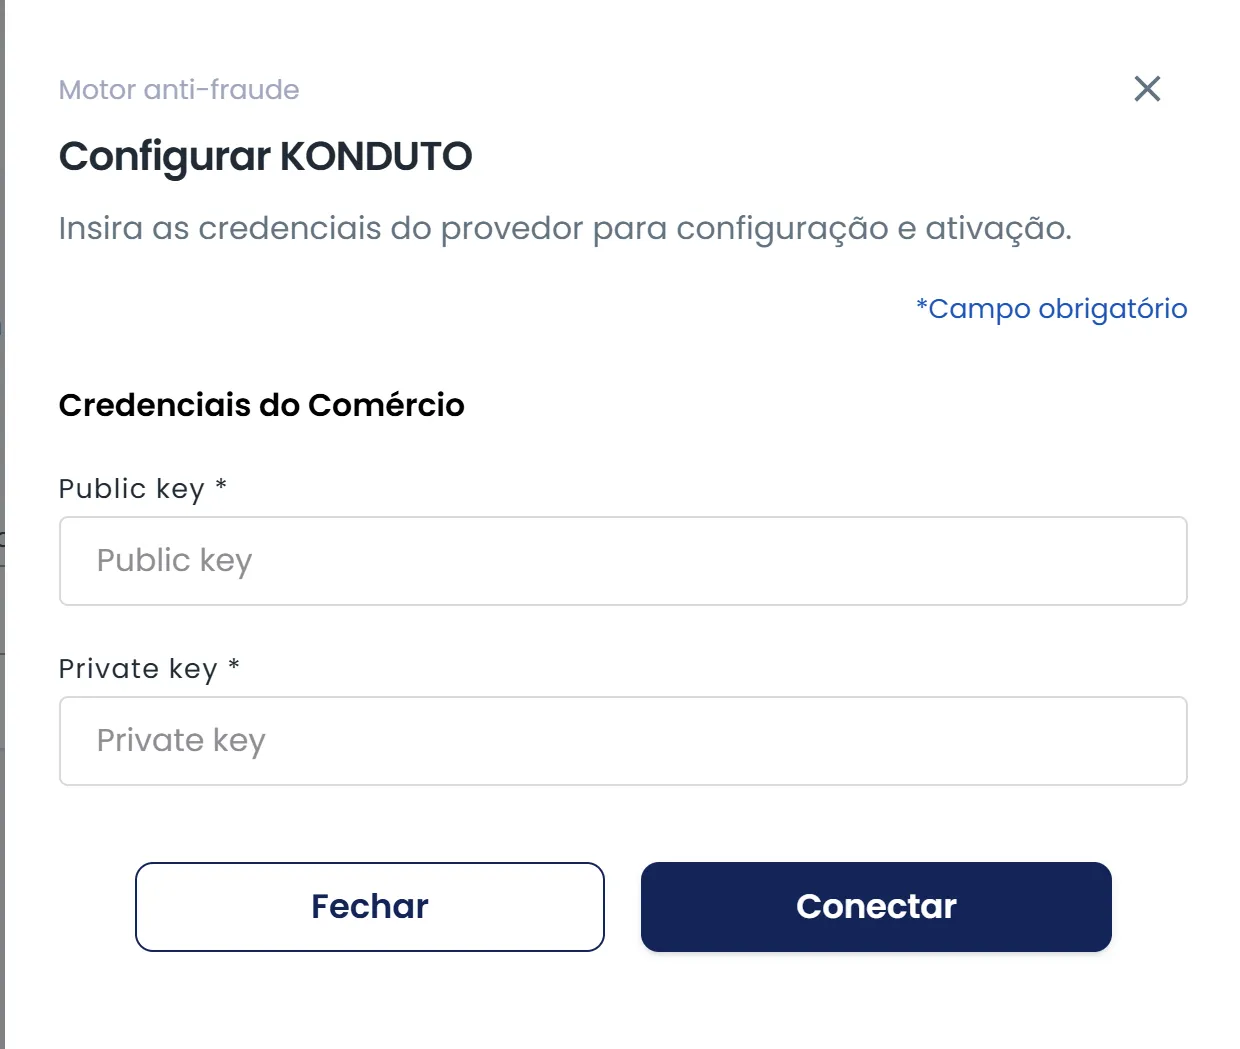
Enter your Konduto credentials in the pop-up window:
- Public key: Enter your Konduto public API key.
- Private key: Enter your Konduto private API key.
-
Click Connect.
A success message indicates Konduto is added as a connection.
5. Activate manual review
DEUNA needs to activate the manual review for Konduto integrations:
-
Go to the DEUNA Admin and click Mechant.
-
In General Fraud Settings toggle on:
- Enable Manual Review
- Enable Automatic Operations Execution

The two options allow DEUNA to automatically perform refunds, captures, or void payments after an anti-fraud post-authorization decision.
6. Set Konduto as post-authorization fraud processor
Konduto works for both pre and post authorization, but it is recommended to configure Konduto for post-authorization.
-
Go to the DEUNA Admin and click Payment Strategies.
-
On Default Processing, click the edit button.
-
On Define the order of trasnsaction processing, click the edit button.
-
Click Edit routing.
-
Toggle on Post authorization fraud analysis.
-
Select Konduto as an anti-fraud engine provider.
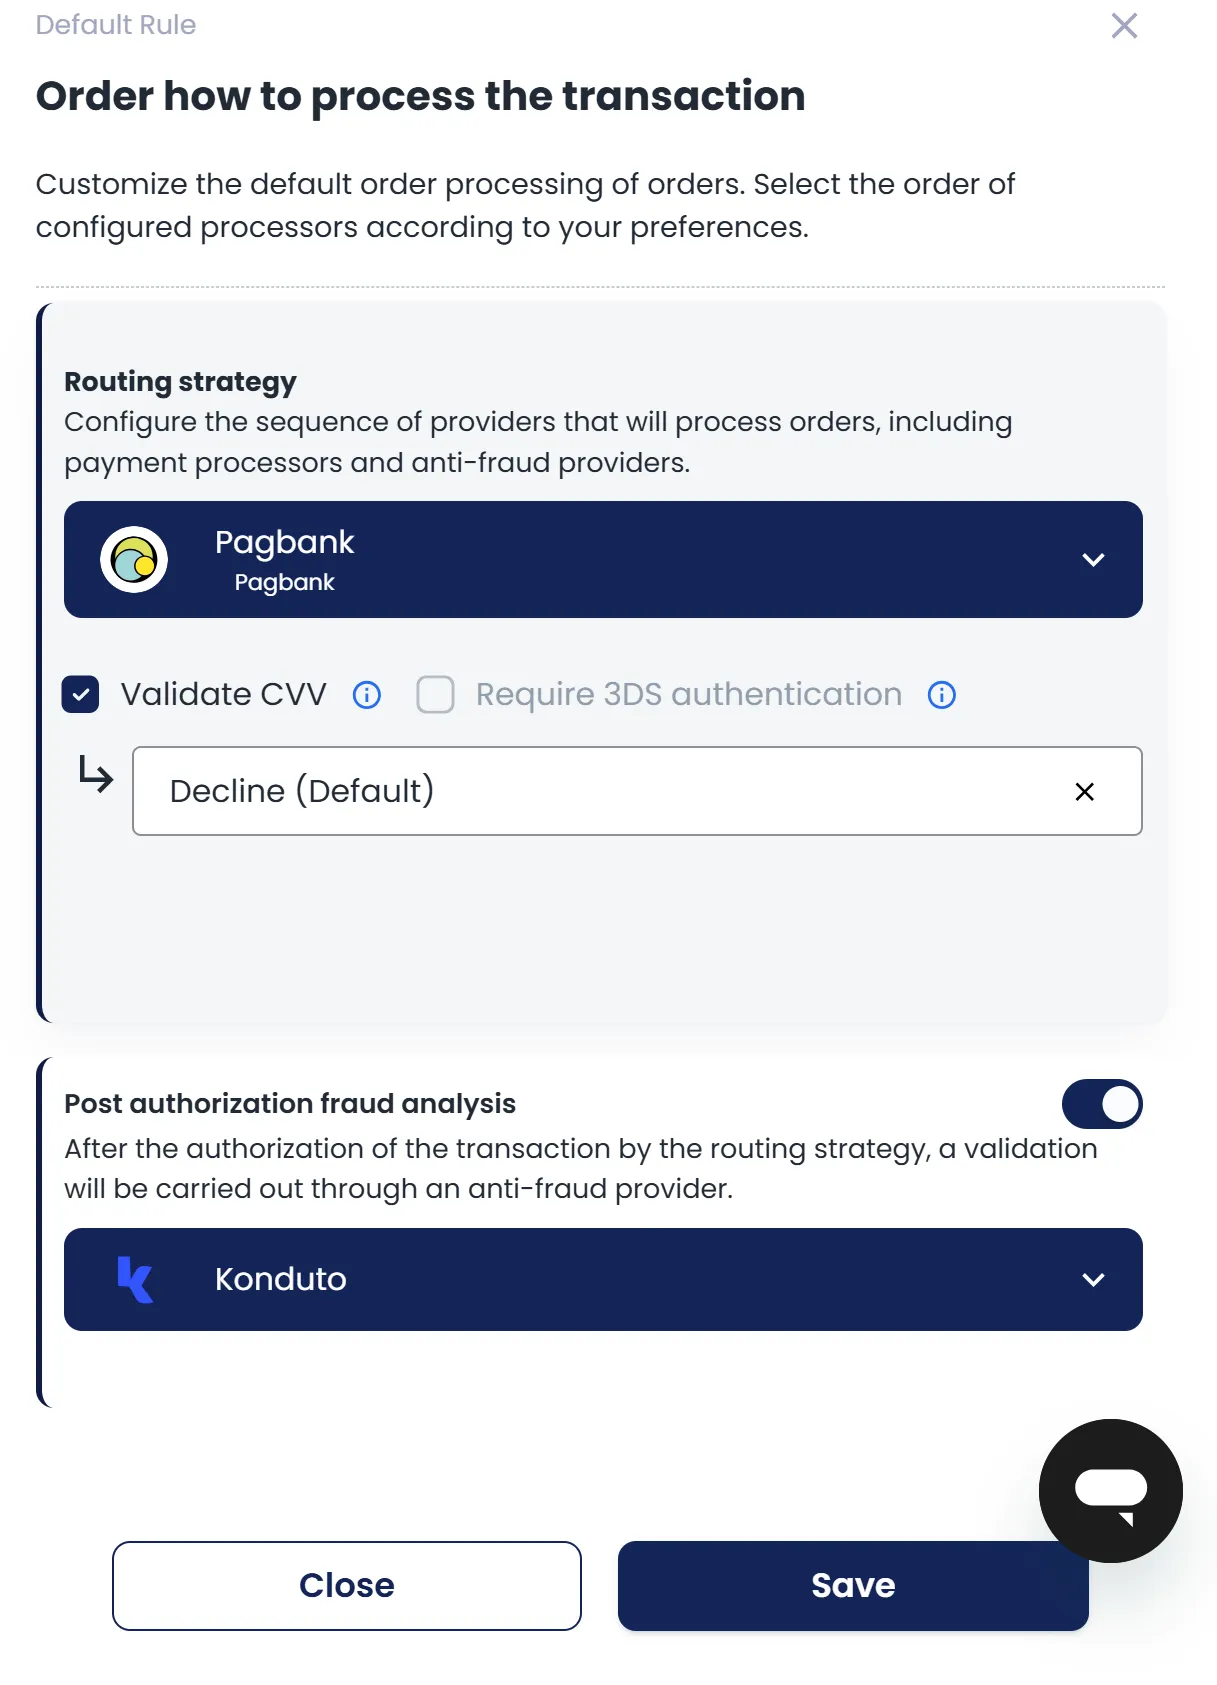
-
Click Save to finish.
7. Configure device fingerprint
Configure the fingerprinting as a last step before conducting tests.
Depending on your integration, follow the next steps in coordination with your DEUNA TPM
VTEX
- Follow the steps in VTEX fingerprint.
- Use the Konduto public key in the
fraudCredentialsobject:
   fraudCredentials: JSON.stringify({
	    KONDUTO: {
        "publicKey": "Konduto Public Key"
      }
   })
Direct API Integration
-
Follow the steps in Device fingerprint.
-
Use the Konduto public key in the
fraudCredentialsobject:fraudConfig: { MERCADOPAGO: {}, //example of a PSP that requires fingerprinting KONDUTO: { publicKey: "Konduto Public Key" } },
Device fingerprint is not available for payment widget or payment link integrations.
8. Test the integration
Perform the integration tests:
| Case | Rule | Use Case | Acceptance requirements | |
|---|---|---|---|---|
| 1 | Automatic approval | Transaction with DEUNA using the email [email protected] |
|
|
| 2 | Automatic disapproval | Transaction with DEUNA using the email [email protected] |
|
|
| 3 | Manual Analysis - Manually Approved | Transaction with DEUNA using the email [email protected] | 1.The buyer use the email [email protected].
|
|
| 4 | Manual Analysis - Manually Declined | Transaction with DEUNA using the email [email protected] | 1.The buyer use the email [email protected].
|
|
| 5 | Manual Analysis - Keep it in Analyzing state | Transaction with DEUNA using the email [email protected] | 1.The buyer use the email [email protected].
| The transaction in Konduto remains as Pending. |
For manual reviews, follow these steps:
-
Go to your Konduto dashboard.
-
Click the Orders tab.
-
Look for the transaction in pending status.
-
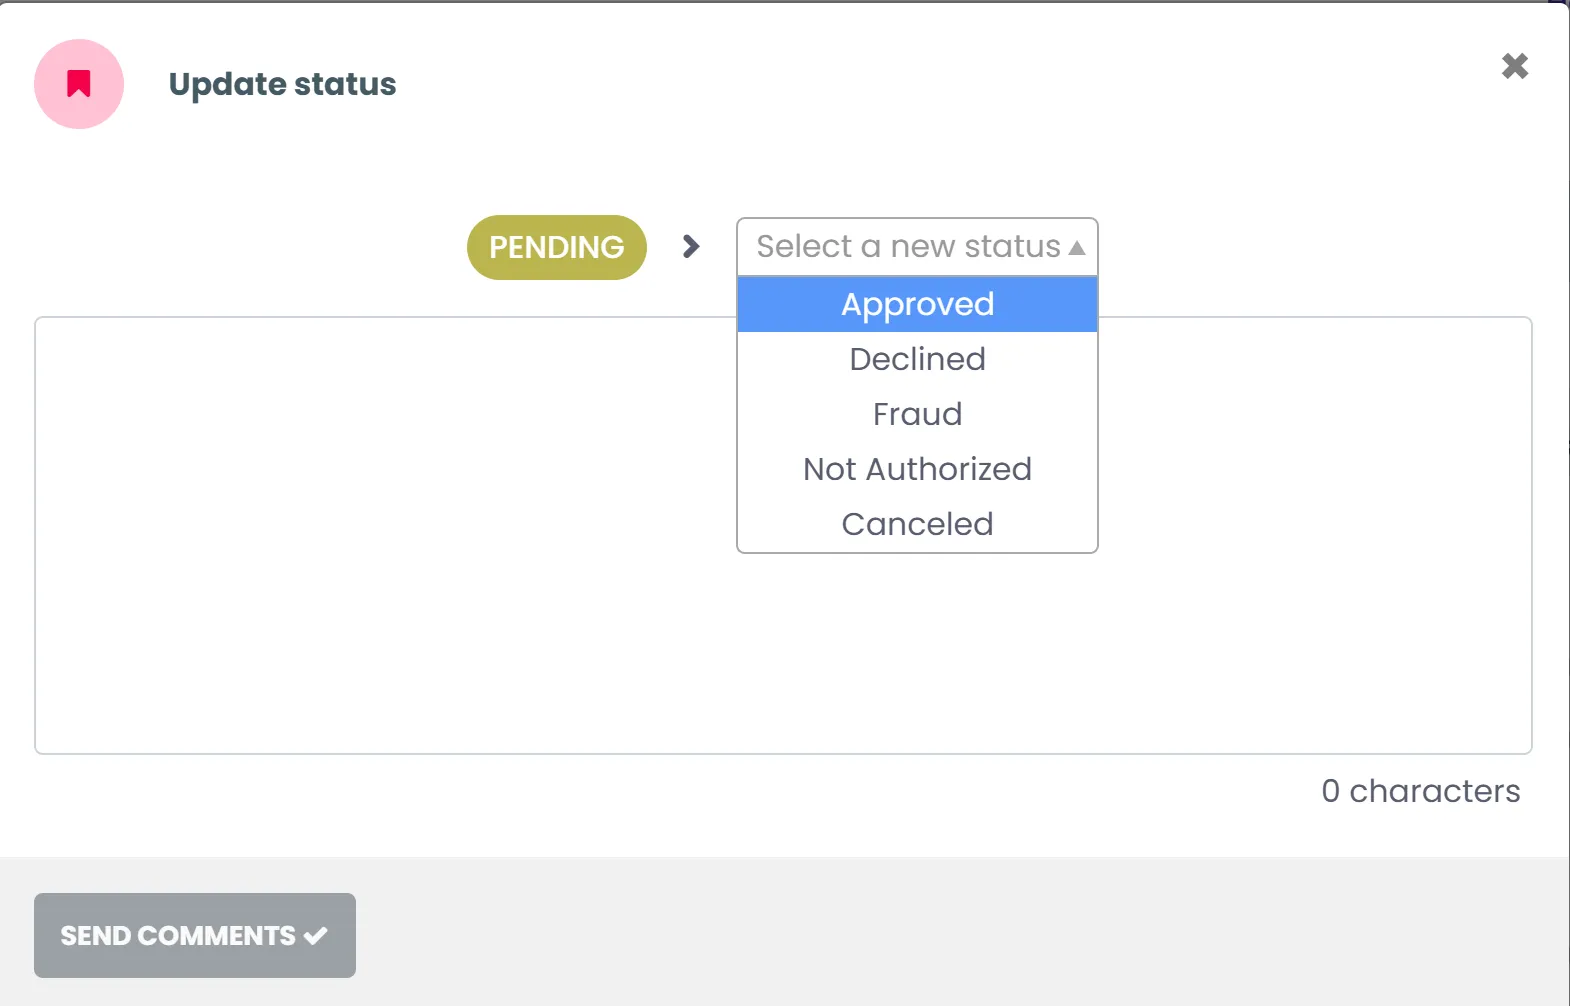
Click Pending to change the transaction status.

-
Select the status from the dropdown list:
- Approved
- Declined
- Fraud
- Not Authorized
- Cancelled
-
Enter comments if needed.
-
Click Save to change the transaction status.
9. Send test evidence to Konduto
In coordination with your DEUNA TPM, send an email to Konduto with the evidence of the performed transactions.
Dear Konduto Team,

We attach evidence of DEUNA tests in our test environment:

1. Automatic approval: 1xxxxxxx123
2. Automatic failure: 1xxxxxxx123
3. Manual analysis - Manually approved: 1xxxxxxx123
4. Manual analysis - Manually declined: 1xxxxxxx123
5. Manual analysis - Keep in Pending status: 1xxxxxxx123

We await your confirmation to activate the test in production.

Best regards
Estimado equipo de Konduto,
Adjuntamos evidencia de las pruebas con DEUNA en ambiente de pruebas:
1. Aprobación automática: 1xxxxxxx123
2. Reprobación automática: 1xxxxxxx123
3. Análisis Manual - Aprobado Manualmente: 1xxxxxxx123
4. Análisis Manual - Declinado Manualmente: 1xxxxxxx123
5. Análisis Manual - Mantenerlo en estado Pending: 1xxxxxxx123
Esperamos su confirmación para realizar la activación en producción.
SaludosPrezada equipe Konduto,
Anexamos as evidências dos testes com DEUNA em um ambiente de test:
1. Aprovação automática: 1xxxxxxx123
2. Falha automática: 1xxxxxxx123
3. Análise Manual - Aprovado Manualmente: 1xxxxxxx123
4. Análise Manual - Recusado Manualmente: 1xxxxxxx123
5. Análise manual - Mantenha em status Pendente: 1xxxxxxx123
Aguardamos a sua confirmação para ativá-lo em produção.
Saudações
Konduto will respond indicating that you can move forward with the process in production.
10. Repeat the process in production
Now you must repeat the process in your Production environment.
The following content provides the production URLs and credentials needed for the integration:
Configure the webhook:
Paste https://api.deuna.io/post-transactions/konduto for DEUNA production Environment.
Set up DEUNA
Toggle off Test mode and use the following credentials:
- Konduto API production credentials:
- Public API key
- Secret API key
Configure device fingerprint
Use Konduto production keys in the fraudCredentialsobject.
Test the integration
After the testing process, send the testing evidence to Konduto.
Send evidence of at least three transactions to Konduto.
Use available cards to perform productive tests.
11. Send the production evidence to Konduto
In coordination with your DEUNA TPM, send the productive transactions to Konduto in the same email.
Konduto will send an email to validate that everything is correct.
Updated 5 months ago