Astropay Wallet
This page provides a comprehensive guide to integrate AstroPay wallet payments using the DEUNA Payment Widget

How it works
The simplest and recommended way to integrate AstroPay is via Offsite Checkout. Users are redirected from your merchant website to the securely hosted AstroPay Checkout page. There, they authenticate, view their balance, and complete the payment.
This integration requires no frontend implementation or UI maintenance on your end. Once the payment is completed, the user returns to the merchant site through a configured redirect URL, and AstroPay sends a real-time callback notification to confirm the final transaction status
Partner Authentication
To interact with AstroPay APIs, you must first obtain an access_token.
- Basic Authentication: Encode your
client_id:client_secretin Base64 and include it in theAuthorization: Basicheader. - Bearer Token: Use the Basic Auth to call the Token Endpoint. The resulting Bearer token is valid for 12 hours.
Requirements
Before implementing AstroPay Wallet payments, ensure you meet the following requirements:
DEUNA Requirements:
-
You must have integrated the DEUNA SDK into your project and have the capability to generate an order token. You should also review the Payment Widget documentation for your specific platform (Web, iOS, Android, or React Native)
-
AstroPay Requirements: You must have a valid App ID and Secret Key from AstroPay
-
Webhook/Callback: A callback URL must be configured in your merchant account to receive payment status updates
-
Configurate AstroPay in your store
First, enable the connection in the DEUNA Admin Panel:
-
Navigate to your Connections and locate AstroPay
-
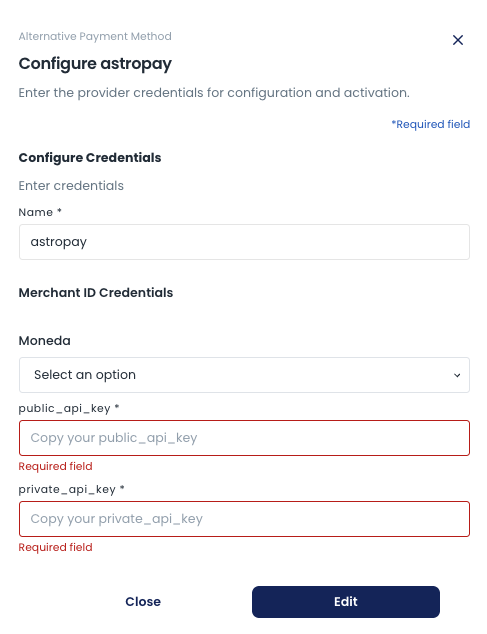
In the configuration window, enter the provider credentials for configuration and activation
- Name: Enter a name to reference the credential (e.g., "astropay")
- Moneda (Currency): Select the appropriate currency option from the dropdown
- public_api_key: Enter your AstroPay public API key
- private_api_key: Enter your AstroPay private API keySave your configuration
-
Save your configuration
-
Integration Steps
1. Obtain Authentication Token
Endpoint: POST /v1/partners/oauth/token Content-Type: application/x-www-form-urlencoded
curl
curl --location 'https://partners-api-sandbox.astropay.com/v1/partners/oauth/token' \ --header 'Content-Type: application/x-www-form-urlencoded' \ --header 'Authorization: Basic <BASE64_CLIENT_CREDENTIALS>' \ --data-urlencode 'grant_type=client_credentials'
2. Create a Purchase (Creating Payments)
Endpoint: POST /v1/payments
This step initiates the payment lifecycle. For AstroPay Checkout, the method must be set to CHECKOUT.
Key Request Parameters:
- amount: Total amount to be charged.
- currency: ISO 4217 code (e.g., USD, ARS, BRL).
- country: ISO 3166-1 alpha-2 code.
- callback_notification: The URL where AstroPay will send payment status updates.
**Response Details:**The response will provide a redirect_url to send the user to the AstroPay checkout and a payment_external_id for tracking.
3. Handle Webhooks (Callbacks)
AstroPay sends a JSON payload to your callback_notification URL once a payment reaches a final state.
Payment Statuses:
- PENDING: Awaiting user action.
- APPROVED: Successfully completed (Final status).
- CANCELLED: Failed, expired, or cancelled (Final status).
4. Get Payment Status
Endpoint: GET /v1/payments/{payment_external_id}?method=CHECKOUT Used to manually verify the current state of a transaction.
Refunds
Endpoint: POST /v1/payments/refund AstroPay supports both full and partial refunds.
Required Fields:
| Property | Type | Description |
|---|---|---|
payment_id | string | The payment_external_id from the original purchase. |
amount | number | The specific amount to refund. |
The response will indicate the new status, such as REFUNDED or PARTIALLY_REFUNDED
Updated 4 months ago